The Planning Stage:
What is it going to look like?
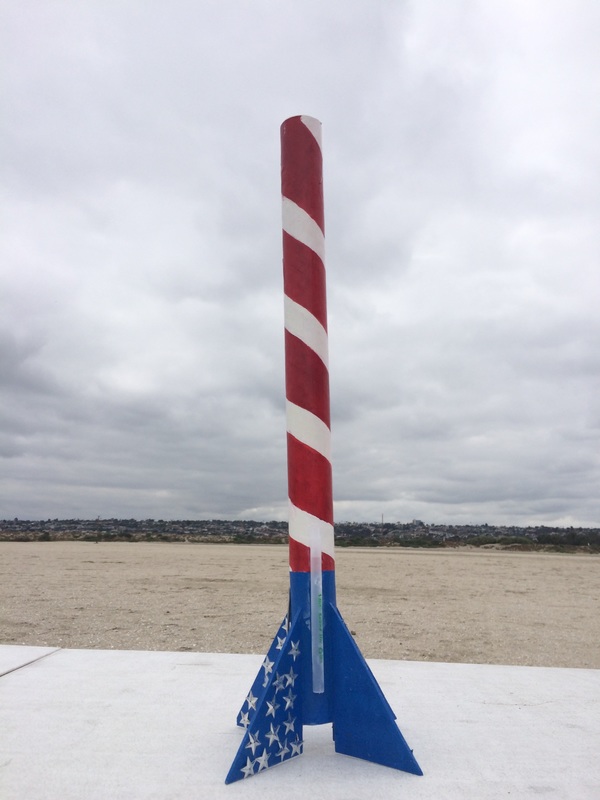
We decided what our rocket was going to look like by researching the best rocket design that will fly high and will look nice. We looked at multiple sources and came to the conclusion that NASA's rocket design was super awesome and we wanted to take their design and mimic it. We didn't want to copy design for design but we did like the way the fins of the rocket and the body of the rocket were set up. We wanted our rocket to fly straight and fly high. We knew the rocket motor we were going to use would only take our rocket so far. So we designed the rocket to be light enough so it would fly higher. I wanted to make the rocket all sparkly and pink but the 2 boys said they didn't want that so we all decided that we would paint the rocket Red, White and Blue. We compromised for sparkles by incorporating stars on the fins. I mean stars are no sparkles but they will have to do for now. So we designed the rocket being Red with White strips and painting the fins blue with two of the fins having 12 stars and on the other two fins having 13. With a total of 50 stars (One for each state!) We then had to decide how the rocket will function. We knew that our parachute would only work if we had something to set it off with. So we had to figure out what thing would set off the parachute. While doing amounts of research we knew that the pressure from the motor would set off the parachute when the rocket itself tips. So when the parachute goes off our rocket will slowly but surely come down in one piece.
Can we put our ideas to paper?
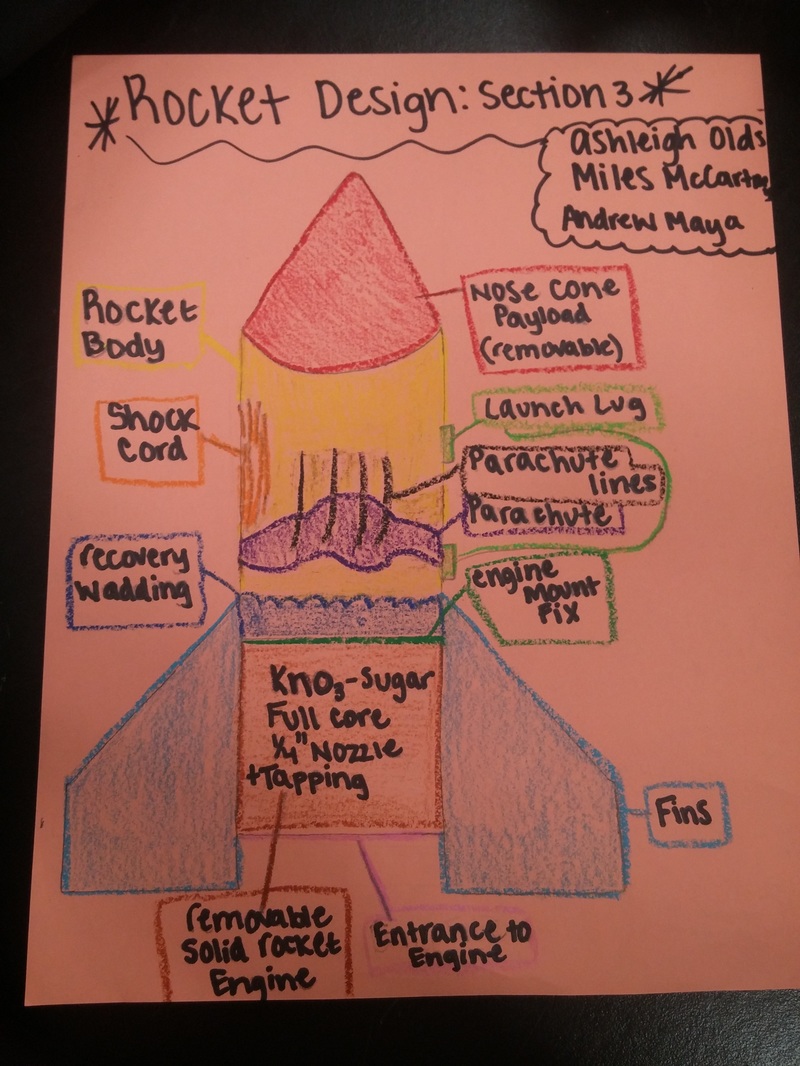
Drawing out the design of our rocket on paper was one of the easiest things to do... except for the fact that we had to all agree on the design of the rocket. We all decided that drawing a standard rocket would be the easiest to draw and we could look back at the paper and kind of get an idea of what were the design parameters of our rocket. So we drew the standard rocket out and labeled all the components of what is going inside the rocket tube. The following are the measurements and surface area of the rocket.
Surface area of the rocket body tube: How I calculated the Surface area of the tube is using the formula of a cylinder and subtracting the two bases. (Circles (top and bottom))
The formula used is two times pi times radius times height, plus two times Pi times radius squared.
(2)(3.14)(.625)(19) plus (2)(3.14)(1.25) which equals 74.61 Plus 7.85 which equals 82.46 \
Since I have a tube and not a cylinder I only have to calculate "the rectangle" of the tube. Which would be the first equation used. So 2(Pi) (radius times height) which equal 74.61. So the surface area of my tube is 74.61.
The formula to calculate my fins (which are triangular) I would use 1/2BH. So my fins are three inches wide and four inches tall and when multiplied by each other it equals 12. Then I multiplied by .five it equals six.
So the surface area of one fin is six inches. Since I have four fins I multiplied six by four and got 24 inches which means the total surface area of all four fins is 24.
Adding the total surface area of the tube and the fins I would get a total of 98.61 inches of surface area on my rocket.
How are we going to making this happen?
When we were done labeling the drawing of the rocket, we knew the next step was making the rocket tube. We couldn't move forward making the tube yet, because we needed to know about how tall and wide the tube needed to be in order to make the tube. We took a PVC pipe about 1.25 inches wide and decided that if we made our tube about 1.25 inches wide then our rocket motor would fit into it perfectly. We then all came to the decision that 19 inches would be the height of our rocket tube. So our rockettube was a total of 19 inches long and 1.25 inches wide.
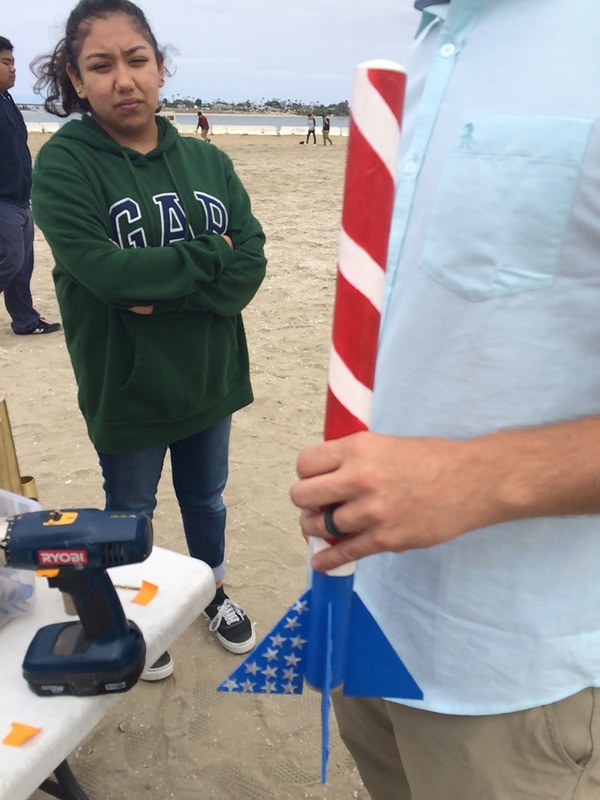
We made a couple of days designated to finishing the rocket. On Friday, April 22nd we will do the rocket tube. We will let it air dry until Monday, April 25th. On Monday we will calculate the measurements of the fins and glue them on the rocket. Then on Tuesday, April 26th we will start making the parachute. On Wednesday, April 27th we will put the launch lugs on out rocket that will be made from straw. Then on Friday the 29th we will Paint our rocket Red white and blue and glue on the stars, so during the weekend it will dry. On Monday, May 2nd we will fix the stripes and any more stars that are needed. Then put the final touches on the rocket.
What is it going to look like?
We decided what our rocket was going to look like by researching the best rocket design that will fly high and will look nice. We looked at multiple sources and came to the conclusion that NASA's rocket design was super awesome and we wanted to take their design and mimic it. We didn't want to copy design for design but we did like the way the fins of the rocket and the body of the rocket were set up. We wanted our rocket to fly straight and fly high. We knew the rocket motor we were going to use would only take our rocket so far. So we designed the rocket to be light enough so it would fly higher. I wanted to make the rocket all sparkly and pink but the 2 boys said they didn't want that so we all decided that we would paint the rocket Red, White and Blue. We compromised for sparkles by incorporating stars on the fins. I mean stars are no sparkles but they will have to do for now. So we designed the rocket being Red with White strips and painting the fins blue with two of the fins having 12 stars and on the other two fins having 13. With a total of 50 stars (One for each state!) We then had to decide how the rocket will function. We knew that our parachute would only work if we had something to set it off with. So we had to figure out what thing would set off the parachute. While doing amounts of research we knew that the pressure from the motor would set off the parachute when the rocket itself tips. So when the parachute goes off our rocket will slowly but surely come down in one piece.
Can we put our ideas to paper?
Drawing out the design of our rocket on paper was one of the easiest things to do... except for the fact that we had to all agree on the design of the rocket. We all decided that drawing a standard rocket would be the easiest to draw and we could look back at the paper and kind of get an idea of what were the design parameters of our rocket. So we drew the standard rocket out and labeled all the components of what is going inside the rocket tube. The following are the measurements and surface area of the rocket.
Surface area of the rocket body tube: How I calculated the Surface area of the tube is using the formula of a cylinder and subtracting the two bases. (Circles (top and bottom))
The formula used is two times pi times radius times height, plus two times Pi times radius squared.
(2)(3.14)(.625)(19) plus (2)(3.14)(1.25) which equals 74.61 Plus 7.85 which equals 82.46 \
Since I have a tube and not a cylinder I only have to calculate "the rectangle" of the tube. Which would be the first equation used. So 2(Pi) (radius times height) which equal 74.61. So the surface area of my tube is 74.61.
The formula to calculate my fins (which are triangular) I would use 1/2BH. So my fins are three inches wide and four inches tall and when multiplied by each other it equals 12. Then I multiplied by .five it equals six.
So the surface area of one fin is six inches. Since I have four fins I multiplied six by four and got 24 inches which means the total surface area of all four fins is 24.
Adding the total surface area of the tube and the fins I would get a total of 98.61 inches of surface area on my rocket.
How are we going to making this happen?
When we were done labeling the drawing of the rocket, we knew the next step was making the rocket tube. We couldn't move forward making the tube yet, because we needed to know about how tall and wide the tube needed to be in order to make the tube. We took a PVC pipe about 1.25 inches wide and decided that if we made our tube about 1.25 inches wide then our rocket motor would fit into it perfectly. We then all came to the decision that 19 inches would be the height of our rocket tube. So our rockettube was a total of 19 inches long and 1.25 inches wide.
We made a couple of days designated to finishing the rocket. On Friday, April 22nd we will do the rocket tube. We will let it air dry until Monday, April 25th. On Monday we will calculate the measurements of the fins and glue them on the rocket. Then on Tuesday, April 26th we will start making the parachute. On Wednesday, April 27th we will put the launch lugs on out rocket that will be made from straw. Then on Friday the 29th we will Paint our rocket Red white and blue and glue on the stars, so during the weekend it will dry. On Monday, May 2nd we will fix the stripes and any more stars that are needed. Then put the final touches on the rocket.
Friday, April 22nd:
We completed the cutting of the strips and the glueing of the strips on the PVC pipe. We had a struggle getting the lines all lined up but we did it. Avery and Kim helped us make sure our lines were symmetrical and even. We then placed the tube on the side and waited for it to dry until Monday!
Monday, April 25th:
When we come into class on Monday we took the tube off of the PVC pipe and found the center of mass. After we found the center of mass we found the center of thrust. We found the the difference from the top of the tube to the center of mass and then measured the center of mass to the bottom of the tube. We subtracted them from each other and found the center of thrust. After this step we were able to determine how big or how small our fins on the rocket needed to be. We then, cut the fins from balsa wood and put four of each on the rocket tube. The measurements that each fin was are three inches wide and four inches tall.
When we come into class on Monday we took the tube off of the PVC pipe and found the center of mass. After we found the center of mass we found the center of thrust. We found the the difference from the top of the tube to the center of mass and then measured the center of mass to the bottom of the tube. We subtracted them from each other and found the center of thrust. After this step we were able to determine how big or how small our fins on the rocket needed to be. We then, cut the fins from balsa wood and put four of each on the rocket tube. The measurements that each fin was are three inches wide and four inches tall.
Tuesday, April 26th:
We will start making the parachute.
We will start making the parachute.
Wednesday, April 27th:
We will put the launch lugs on out rocket that will be made from straw.
We will put the launch lugs on out rocket that will be made from straw.
Friday, April 29th:
Paint our rocket Red white and blue and glue on the stars, so during the weekend it will dry.
Paint our rocket Red white and blue and glue on the stars, so during the weekend it will dry.
Monday, May 2nd:
We will fix the stripes and any more stars that are needed. Then put the final touches on the rocket.
We will fix the stripes and any more stars that are needed. Then put the final touches on the rocket.
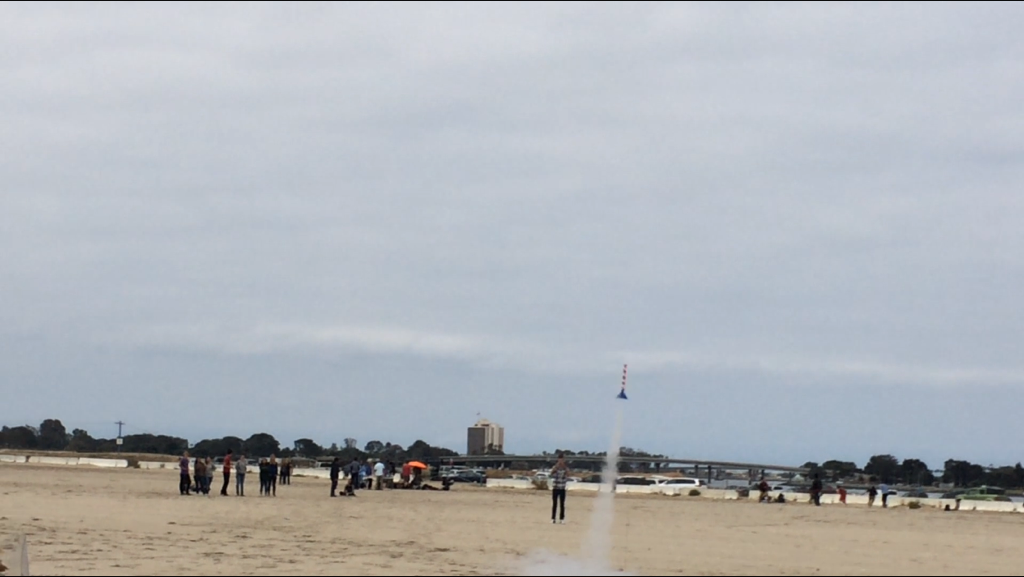
When dates were reached:
We successfully reached all our dates by plan. Everything went smoothly.