The process stage:
Here you can find everything we did during our building process.
The Planning Stage:
While planning our experiment we came up with a plan that consisted of What our rocket is going to look like, Who is doing what and When our rocket was going to be finished. Then plan can be found below:
Who is in our group?
Ashleigh, Miles, Kim
What our rocket will look like:
The body of our rocket will be 4 sections of 11 inch by 3 millimeters of Balsa Wood .
The fins on our rocket will be a triangular shape and each will be half of a 3 inch by 3 inch square.
We won't paint our rocket because we don't want to add any unnecessary weight.
Who will do what steps?
When:
Our rocket will be finished by Friday.
We evenly distributed who did what because we didn't want anyone to do more or less than anyone else.
Ashleigh, Miles, Kim
What our rocket will look like:
The body of our rocket will be 4 sections of 11 inch by 3 millimeters of Balsa Wood .
The fins on our rocket will be a triangular shape and each will be half of a 3 inch by 3 inch square.
We won't paint our rocket because we don't want to add any unnecessary weight.
Who will do what steps?
- Cutting Body: Ashleigh
- Gluing Body: Miles
- Sanding Body: Kim
- Cutting Fins: Ashleigh
- Gluing Fins: Miles
- Cutting Engine Mount: Ashleigh
- Gluing Engine Mount: Kim
- Staples: Kim
- Rocket Point: Miles
When:
Our rocket will be finished by Friday.
We evenly distributed who did what because we didn't want anyone to do more or less than anyone else.
The steps to completing our rocket:
- Cutting Body: Ashleigh cut 4, 11 inch by 3 millimeter pieces of Balsa wood to build the body of the rockets.
- Gluing Body: Miles glued the 4 pieces of Balsa wood together to form the body of the rocket.
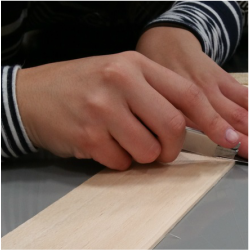
- Sanding Body: Kim sanded the body of the rocket because we needed a round shape and the 4 pieces of Balsa wood when glued together were square. So, she made the body of the rocket round.
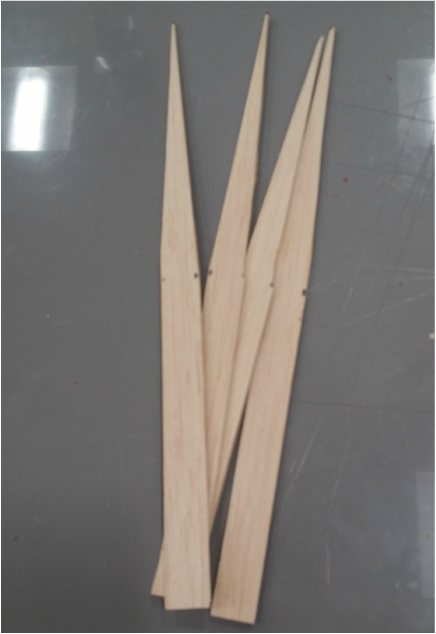
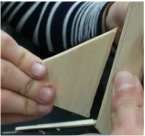
- Cutting Fins: Ashleigh cut Balsa wood to make the fins of the rocket in a way that the rocket could fly straight up and not go in circular motions. The fins were cut in a 3 inch by 3 inch square and then cut from corner to corner so they could be evenly placed.
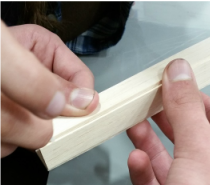
- Gluing Fins: Miles glued the Balsa wood fins onto the body of the rocket directly into the center so that the rocket would have even balance on each side.
- Cutting Engine Mount: Ashleigh cut the Balsa wood to make a engine mount to fit inside the body of the rocket.
- Gluing Engine Mount: Kim placed the engine mount inside the body of the rocket about half way from the bottom of the body to the top of the fins. So that when the engine is placed inside later in the project it won't shoot outside of the rocket when we launch it.
- Staples: Kim placed staples about 1-2 inches above the fins on the body of the rocket so that when we launch the rocket it can be placed on the launch pad evenly.
- Rocket Point: Miles cut half of a dropper and used the dropping side and placed it on top of the rocket point so that the point of the rocket won't injure anyone.
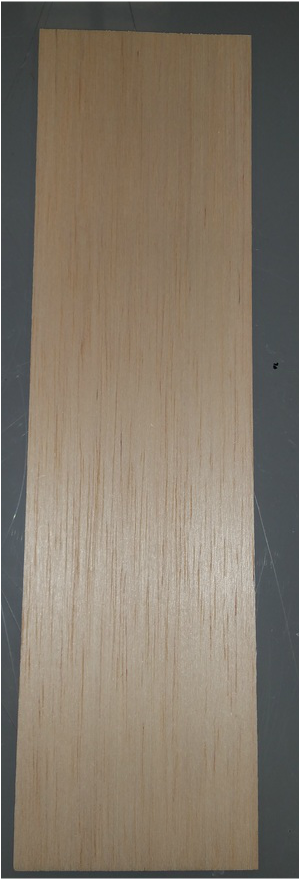
This is the 11 inch long piece of Balsa Wood
Ashleigh cut 4, 11 inch by 3 millimeter pieces of Balsa wood to build the body of the rockets.
  | Miles glued the 4 pieces of Balsa wood together to form the body of the rocket. |
Kim sanded the body of the rocket because we needed a round shape
 | Ashleigh cut Balsa wood to make the fins of the rocket |
Here is where Miles carefully glued the fins on the body of the rocket.
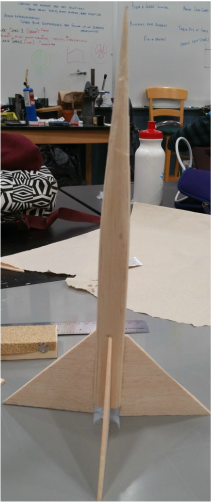
Our Rocket!
The process of building a mini rocket motor:
 | 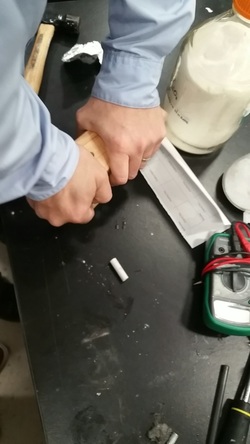 |
After testing our motors 3 or 4 times we then decided it was time to launch our rocket.
The first time we launched our rocket it went very high. When the rocket came down we went to go pick it up to find that our fin on the rocket broke off. We went inside to glue our rocket fin back together. Then after talking to our teacher we decided our rocket motor needed to be more powerful. Our rocket weighed about 8 grams and we had a big hole where the rocket motor goes inside. We think that because the rocket is heavy we need a bigger motor. We then made a rocket that has more fuel inside. We launched it again and our rocket was fine. It flew out of sight. It went even further than the first one and when it landed it was fine, there were no broken pieces to our rocket.
The first time we launched our rocket it went very high. When the rocket came down we went to go pick it up to find that our fin on the rocket broke off. We went inside to glue our rocket fin back together. Then after talking to our teacher we decided our rocket motor needed to be more powerful. Our rocket weighed about 8 grams and we had a big hole where the rocket motor goes inside. We think that because the rocket is heavy we need a bigger motor. We then made a rocket that has more fuel inside. We launched it again and our rocket was fine. It flew out of sight. It went even further than the first one and when it landed it was fine, there were no broken pieces to our rocket.
THE PROCESS OF BUILDING A MINI ROCKET MOTOR
First we rolled up a piece of paper about 4 inches long and 4 inches wide. We had to make the paper big enough but small enough to fit into the rocket motor molder. We then added glue to the part of the paper that would stick on after it was rolled.
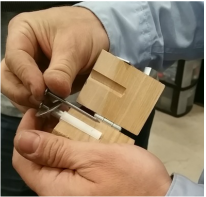
We put our rocket motor into the brown wooden box (Motor Machine) that would latch the motor tightly inside.
We then rolled aluminum foil about 4 inches long and wide (which would act as a conductor to the fuse) and then we shoved the foil into the bottom of the motor. We had to make sure it tightly fit into the motor because we wanted to make a point at the end of it so when the motor is lit by the fuse it would shoot out from the bottom.
After adding the foil we added Postasium Nitraite and Powdered sugar. We mixed them together and poured it to the rim. We then had to pat the fuel down because we wanted to get all the air out of the fuel. Then, we added some more fuel.\\
After adding the fuel we got a long nail with a washer over it and a small round thing that could help make the core. We wanted to make a core inside the rocket because the fuel would burn more quickly. We then got a piece of aluminum foil and rolled it very tightly between our hands and then wrapped the foil around the nail. We had to leave a little space between the point of the nail and the foil. We didn't want the foil to overlap the point.
Then we took the core maker and put it right in the middle of the motor and pushed down on the washer. After we couldn't physically push the washer down anymore we got a block of wood (which had a hole for the nail to go) put it precisely over the nail so the the nail wouldn't get pushed down into the core and then we hammered the wood until we were positive it could no longer be pushed anymore.
After making the core we slowly twisted the nail out of the motor. We had to twist slowly because we didn't want the core to collapse.
We left the tin foil in the core because it acts as a conductor.
Then we got a small piece of fuse and placed it into the core of the motor and closed off the top so that it made a nozzle.
We then went outside to try the motor out. We have to test the motors before using them on our rockets because we don't want the motor to blow up and it destroy our rocket. The foil inside is burning at about 1500 degrees Celsius. So after launching it we have to go and find it, since the motor is still hot enough to start a fire.
REFLECTING ON OUR ROCKET!
2/12/2016
Reflect:
What were your expectations?
I was expecting our rocket to have totally plummeted. Kim, Miles and I have never made a rocket and we are no experts. But I was planning that our rocket was going to blow up in the sky (Which would be kind of cool but not safe...) or just not take off at all. I'm not disappointed though! I really liked watching our rocket fly I felt accomplished!
What worked?
Our rocket was not too heavy. Also, our rocket flew very high which is also good because that means our rocket wasn't a total disaster. Then, the fact that it didn't break the second time was good! Like I said previously I think our rocket required a little more of a push than the others.
What didn’t work?
The first time we launched the rocket the fin came off. So I don't think we fled very well. Also our rocket nose dived straight into the grass so I think if maybe we made it less top heavy it wouldn't have done that.
What did you learn or are your take aways for rocket design and construction from this experience?
I learned how to safely construct a motor, how to handle the hot motor without bringing myself, how to use super glue without it getting everywhere., I learned about weight and mass and how to evenly distribute weight on a rocket so one side isn't heavier than the other and lastly, I learned that when adding rocket fuel you don't want to pat the fuel down too much, you should pack it like you would brown sugar!
What is important for building rockets?
Defiantly paying attention to what the teacher is showing you. If you do one step wrong your whole rocket can blow up. So, I think it's most important to listen and ask questions because that's the only way you can learn and be safe.
If you had to do this again, would you do anything differently next time?
Yes, I would test my rocket more than 2 times. It's fun to see what you have accomplished. Also I would make sure everything I glued on is firmly in place.